Wednesday, 28 November 2012
Week 7 Lab 4
The aim of this Lab was to take a sound file that I downloaded from moodle and improve the quality of said sound clip. After downloading the wave and opening it in Cool Edit Pro, I began to investigate ways to improve it.
This image shows the final improved sound Wav after a series of small changes. Firstly, I applied a notch filter which I set at 440Hz and 2dB. I also added DTMF Lower tones at 100dB and DTMF Upper tones at 2dB. I then targeted and zoomed in on the spoken sections, the peaks, and I amplified those sections by 10.98dB. I did attempt to amplify them by more, however, it causes 'White Noise' i.e. a loud continuous noise. Finally, I used the hiss reduction function to clean up the over all quality of the sound.
The second part of the Lab was to edit the .wav to make the speaker sound angry. This was more difficult than the first part of the task and took longer.
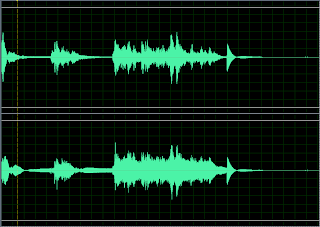
I achieved this part of the task by making the start of each word louder but also by gradually increasing the volume of the sentence. The resulting wave of the below steps is shown on the right. Firstly, I individually selected the first letter of each word and increased its amplitude by on 1dB, which was enough to make those letters noticeably louder and more hard hitting. Then by selecting the entire wave I added a gradual amplitude change of 2dB from the start of the sound through to the very end of the spoken section of the file.
Section 3 of the Lab was actually very easy despite it sounding quite difficult. The task was to take the already edited .wav and make it sound as if it was being recorded in a church hall. I edited the improved sound file. Under the reverberation option I could select Church reverb, so I applied this to the entire wave. I then added a bit of amplification to boost the volume slightly after the reverb made the sound a quieter.
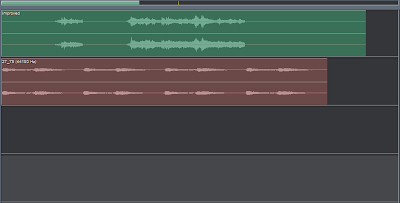
The final part of this lab was to add church bells in the distance. I started with the completely edited .wav (shown in green) and I then found an extra .wav of a church bell (shown in red). I duplicated the sound file to double its length so that it spanned the length of the initial sound file. I amplified the church bell .wav by -10dB so that it was quiet in comparison to the other .wav as it was meant to be outside the church that the man is standing in.
Thursday, 8 November 2012
Hearing Lecture
Outer Ear - The Pinna and the Ear Canal basically act as a guide to sound waves, directing them down the ear to the ear drum. The Pinna also acts in such a way that it can collect information on the direction and source of a sound wave as it hits your ear. This part of the ear also acts as an amplifier for the sound that you hear.
The Middle Ear - The sound heard travels down your ear canal to the ear drum causing it to vibrate. The vibration by the ear drum is transferred through small bones called Ossicles, and this vibration causes the Cochlea to vibrate. The vibrations actually reduce power loss in the sound wave and once at the Cochlea is transferred to the fluid medium in the Cochlea. Loud noises/sounds create excessive amounts of vibration in the Ossicles which can damage hearing, therefore, there is a neuro-muscular feedback system in your ear that helps to protects your hearing from damage.
The Inner Ear - Vibrations in the oval window creates waves in the cochlear fluid which in turn causes the cochlear perform a spectral analysis. Sensor cells cause neurons in the auditory nerve to react. The timing, amplitude, and frequency information is taken to the auditory brain stem where neural processing takes place.
Malleus - a small hammer shaped bone also known as an ossicle which is part of the middle ear.
Stapes - Transmits the sound vibrations from the incus to the cochlea.
Incus - Connects the Malleus to the Stapes.
Scala Vestibuli - filled cavity inside the cochlea that conducts the vibrations to the scala media.
Scals Media - Also know as Cochlea Dust, it is also a filled cavity inside the cochlea.
Scala tympani - function is the same as scala vestibuli and is to transduce the movement of the air that casue the vibrations in the ossicles.
Organ of Corti - This section contains the auditory sensory cells. which in turn connect to the brain. This is only found in mammals.
Impendance Matching is a very important mechanism in the middle ear. It transfers vibrations ceated by the sounds your hear from the large tympanic membrane to the smaller oval window in the middle ear. The reason this is vital is that the oval window is low impedance and this is needed as high impedance vibrations of the cochlear fluid will reduce the energy transmitted dramatically to 0.1%.
Auditory Brainstem
The main features of auditory brainstem processing are that there is a two channel set of time domain signals in contiguous, non linearly spaced frequency bands; There is separation of the left from the right ear signals; low from high frequency information; timing from intensity information; re-integration and re-distribution at various specialised processing centres; binaural lateralisation; binaural unmasking; listening in the gaps and channel modelling.
Week 6 Lab 3
Lab 3
The lab this week was to create a wave and then mix different waves together to create a new wave. The waves were created using a fundamental and the harmonics of the fundamental.
The initial wave (fundamental) was created by setting the sample rate to 8000Hz, 8 bit, mono, the frequency to 400Hz and the duration to 0.02 seconds. This created the following wave :
Harmonic
Number
|
1
|
2
|
3
|
4
|
5
|
6
|
7
|
8
|
9
|
Amplitude relative to Fundamental
|
1
|
0
|
1/3
|
0
|
1/5
|
0
|
1/7
|
0
|
1/9
|
Amplitude dB
|
0
|
-9.54
|
-13.9
|
-16.9
|
-19.1
| ||||
Frequency
|
400
|
1200
|
2000
|
2800
|
3600
|
The initial wave (fundamental) was created by setting the sample rate to 8000Hz, 8 bit, mono, the frequency to 400Hz and the duration to 0.02 seconds. This created the following wave :
The fact that I set the frequency to 400Hz, meaning 400 waves per second, and the duration to 0.02 seconds results in 8 cycles of the wave being drawn as 400Hz/0.02s = 8.
Next I worked my way through the chart only creating the odd harmonics as waves i.e. 1 (fundamental), 3, 5, 7 and 9. I created all of these waves individually always leaving the sample rate the same but changing the frequency and the amplitude for every harmonic. I worked out the frequency by multiplication. The 3rd harmonic of the fundamental has a frequency 3 times greater, similarly, the 5th harmonic has a frequency 5 times greater and so on.
To work out the respective amplitudes of the harmonics I used a simple equation. For the 3rd harmonic I did 1/3, I then took the log of the answer, I then multiplied it by 20 to give me the amplitude.
For the 3rd harmonic of the fundamental the data I input was amplitude -9.54 and frequency 1200Hz, the wave created was:
Similar to the fundamental wave the number of cycles was calculated by dividing the frequency, 1200Hz, by the time which was 0.02 seconds, resulting in 24 cycles of the wave. As previously explained the 3rd harmonic of the fundamental has a frequency 3 times greater therefore the number of cycles of the wave within the same time period is also 3 times higher, 8 compared to 24.
I performed the same operation on the other fundamentals and then I cut and mix pasted them all into one wave. As I did so I noticed that a square wave shape started to take form as I pasted each wave in one at a time. The resulting wave after I pasted all waves on top of the fundamental was:
Part two of this lab was very similar to part one, however, this time after creating the fundamental tone I was to create the 2nd harmonic upto the 5th harmonic and merge them with the fundamental pure tone. The table of data was worked out the same as it was above and was as follows:
Harmonic
Number
|
1
|
2
|
3
|
4
|
5
|
Amplitude relative to Fundamental
|
1
|
1/2
|
1/3
|
1/4
|
1/5
|
Amplitude dB
|
0
|
-6.02
|
-9.54
|
-12.04
|
-13.9
|
Frequency
|
400
|
800
|
1200
|
1600
|
2000
|
The initial fundamental pure tone was created using the same parameters as I used above;8000Hz, 8 bit, mono, the frequency to 400Hz and the duration to 0.02 seconds. The wave created therefore was identical to the fundamental wave at the top of the page. However, because I am now adding in all the harmonic waves instead of just the odd numbers the resulting mixed wave is significantly different from that shown above.
The wave created is almost like mountains in a way. Also, as there are completely vertical inclines on the wave it makes it more like a digital wave as opposed to an analog wave. A digital wave only has 2 options, 1 or 0/ on or off, although it is not quite as simple a wave as that it is getting close to it.
Subscribe to:
Posts (Atom)